![]()
| The API function declaration This is the text of the API function declaration to add to your modQuote.bas module. Type it exactly as shown as one long line with no line breaks: Declare Function WinHelp Lib "user32" Alias "WinHelpA" (ByVal hwnd As Long, ByVal lpHelpFile As String, ByVal wCommand As Long, ByVal dwData As Long) As Long
Copying
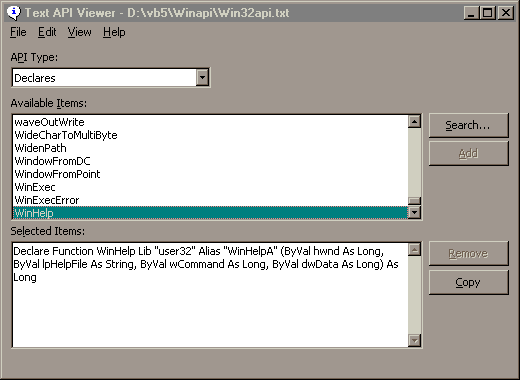
API functions Step 1: Load the API Text Viewer -- you'll find it in your VB5 program group. Step 2: If you haven't previously used the Text Viewer, you'll need to load the text file. To do this, select File, Load Text File, locate the file Win32api.txt and select Open. Step 3: When the file has loaded, from the API Type text box select Declares and scroll down the Available Items list until you locate the WinHelp declaration and double-click it to add it to your Selected Items list (see Figure 5e). This is the only item you need for this project, but if you need more you can scroll and add as many as you need to your list. Step 4: Select Copy to copy your selected items and close the API Viewer. Switch to your VB application, locate the cursor where you want the function to appear and use Edit, Paste to paste it into position.
More
advanced compiling You can also change the background colour of the help window to the more familiar yellow and grey combination. To do this, select the Windows button, in the 'Create a window named' text box type 'main' and in the 'Based on this standard window' list box select either Reference (to create a large help window on the left of the screen taking up approximately two-thirds of the window) or Procedure (to create a smaller window in the top-right corner). Click OK and then select the Color tab and alter the colours if required and click OK. Select the 'Save and Compile' button to recompile your help file. Your new help file should resemble the one in Figure 6e.
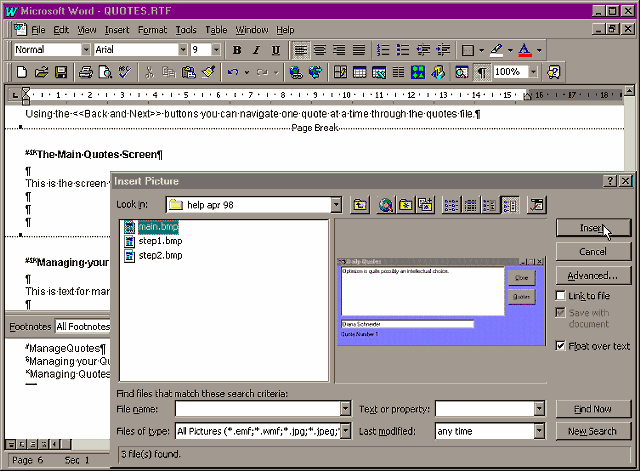
More advanced help options You can also add pages which have only the # footnote which you can use for What's This Help. For each new topic that you add to your help file you'll need to add its Topic ID to the [MAP] section in the help project file (quotes.hpj) so that you can refer to this topic in your VB project. In addition to text, you can also add images to any help screen by including the graphic in your help file. You can use graphics in a number of formats, the most usual being bitmaps (BMP) or windows metafiles (WMF). You can also create bitmaps with hotspots using the Hotspot Editor, which you'll find in the Microsoft Help Workshop program group -- read the help in the Help Workshop and the Hotspot Editor to learn more about these features. The section 'Using Paint Shop Pro' shows you how to include a screenshot in your help file using Paint Shop Pro. Remember that you'll need to save and then recompile your quotes.rtf file every time you make changes to it.
Using
Paint Shop Pro Step 1: Load Paint Shop Pro. Step 2: Load your Visual Basic application and take a snapshot of your screen by pressing the Print Screen key (or Alt+Print Screen if you only want to take a copy of the currently active window). Step 3: Switch to Paint Shop Pro and select Edit, Paste.
Step 5: Save the image using File, Save. Give the image a filename and the extension BMP, and in the 'Save as type' list box select 'BMP -OS/2 or Windows Bitmap' and click Save.
|

|