|
|||||||||


![]()
![]()
![]()
 Whizz-bang
worksheets Whizz-bang
worksheets
Helen Bradley demonstrates two neat effects to add to your Excel 97 worksheets.
|
|||||||||||||||||||||||||||||||||
| Using
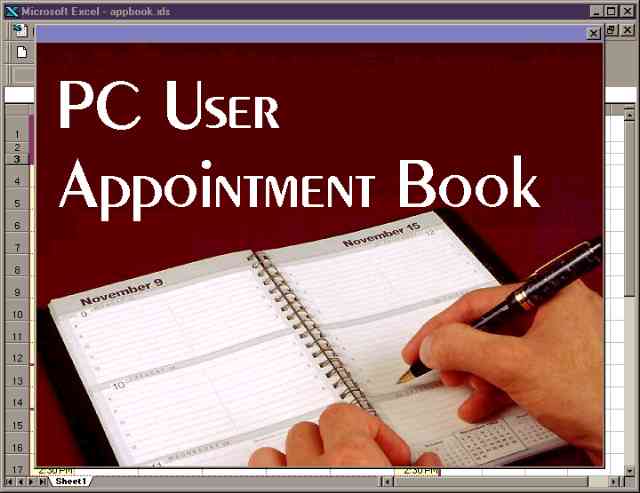
Excel 97, we'll show you how to create a neat splash screen for a worksheet and a
wonderfully simple calendar function which makes selecting a date as easy as clicking a
mouse.
The Splash Screen To add a splash screen to a workbook, you first need a workbook to add it to; we've used the Appointment book workbook from the October 1996 issue of PC User but any workbook will do. |
|
||||||||||||||||||||||||||||||||
|
|||||||||||||||||||||||||||||||||
 Step 2:
Select Tools, Macro, Visual Basic Editor to start up the Visual Basic Editor. Display the
Project Explorer window using View, Project Explorer and locate the VBA Project for the
workbook you are using and select it. Step 2:
Select Tools, Macro, Visual Basic Editor to start up the Visual Basic Editor. Display the
Project Explorer window using View, Project Explorer and locate the VBA Project for the
workbook you are using and select it. |
|||||||||||||||||||||||||||||||||
 Step 3: Select Insert, UserForm to add a form to your
workbook project. Step 3: Select Insert, UserForm to add a form to your
workbook project. |
|||||||||||||||||||||||||||||||||
 Step 4: Right-click on the UserForm and select Properties
from the shortcut menu. In the Properties dialogue make the settings listed in the box
'Settings for Properties dialogue': Step 4: Right-click on the UserForm and select Properties
from the shortcut menu. In the Properties dialogue make the settings listed in the box
'Settings for Properties dialogue':
Size the form so that the picture displays neatly on it.
|
|||||||||||||||||||||||||||||||||
 Step 5: Add a label to your form using the Label tool on the
toolbox and add text to welcome your user. If the settings for the label require
alteration, right-click on the label and select Properties from the shortcut menu. For our
SplashScreen we selected Font to alter the style and size of the text in the Label. The
text colour was set by selecting ForeColor and the Palette tab and then selecting White as
the colour for the font. Finally, so the picture on the form would show through the label,
we set the BackStyle to 0-fmBackStyleTransparent. Step 5: Add a label to your form using the Label tool on the
toolbox and add text to welcome your user. If the settings for the label require
alteration, right-click on the label and select Properties from the shortcut menu. For our
SplashScreen we selected Font to alter the style and size of the text in the Label. The
text colour was set by selecting ForeColor and the Palette tab and then selecting White as
the colour for the font. Finally, so the picture on the form would show through the label,
we set the BackStyle to 0-fmBackStyleTransparent.
|
|||||||||||||||||||||||||||||||||
 Step 6: Double-click on the UserForm to display the code for
the SplashScreen and select Activate from the drop-down list at the top-right of the
window (this list currently shows the word 'click'). Type this line of code between the
lines that already appear on the screen: Step 6: Double-click on the UserForm to display the code for
the SplashScreen and select Activate from the drop-down list at the top-right of the
window (this list currently shows the word 'click'). Type this line of code between the
lines that already appear on the screen:Application.OnTime Now + TimeValue("00:00:03"), "RemoveSplashScreen"
|
|||||||||||||||||||||||||||||||||
 Step 7: Select Insert, Module and into the module code box,
type this code: Step 7: Select Insert, Module and into the module code box,
type this code:
|
|||||||||||||||||||||||||||||||||
 Step 8: Display the project by selecting View, Project
Explorer and locate the object called ThisWorkbook. Double-click on ThisWorkbook to open
its code window. In the left-most drop-down list box select the option WorkBook and from
the right-most drop-down list box, select Open. Type this line of code between the lines
that already appear on the screen: Step 8: Display the project by selecting View, Project
Explorer and locate the object called ThisWorkbook. Double-click on ThisWorkbook to open
its code window. In the left-most drop-down list box select the option WorkBook and from
the right-most drop-down list box, select Open. Type this line of code between the lines
that already appear on the screen:
Select File, Close and Return to Microsoft Excel and save your Excel file using File, Save.
|
|||||||||||||||||||||||||||||||||
 Step 9 To test the Splash Screen, close the file using File,
Close and then open it again. The workbook will open and the Splash Screen will appear on
the screen for three seconds before disappearing. Step 9 To test the Splash Screen, close the file using File,
Close and then open it again. The workbook will open and the Splash Screen will appear on
the screen for three seconds before disappearing.
|
|||||||||||||||||||||||||||||||||
| How the splash screen works This project uses the Workbook_Open event to display the Splash Screen. The Workbook_Open event occurs whenever a workbook is opened and the code in the event handler 'SplashScreen.Show' displays the userform called SplashScreen in the Excel window. As a UserForm (ie, the Splash Screen) takes over the display so that nothing can happen while it is visible, you have to program its removal so that your user can work on the workbook. The removal of the Splash Screen is handled by the code in the Splash Screen's Activate event. When the Splash Screen is displayed with the Show method, its Activate event is called. This is the code in the Splash Screen's Activate event which is run when the Splash Screen displays: Application.OnTime Now + TimeValue("00:00:03"), "RemoveSplashScreen" The OnTime method schedules a procedure to be run sometime in the future. So, this code will run the procedure called RemoveSplashScreen after three seconds have passed. The procedure RemoveSplashScreen contains the single line of code 'Unload SplashScreen' which removes the SplashScreen from memory. This effectively removes it from the screen and frees up the memory space it was consuming. Once you have created your first splash screen, you'll want to create bigger and better ones to add to other workbooks. Experiment with the Label object and the Image object tools to include more fancy text and images to your Splash Screen.
|
|||||||||||||||||||||||||||||||||
| Easy date entry One problem with entering dates in a workbook is the different way dates are displayed in the US and Australia. Australians use the dd/mm/yy format for dates whereas the US uses mm/dd/yy. This wouldn't be so much of a problem if the software was not American (therefore more likely to use American settings by default) and if the date format for an Excel workbook were not dependent on the current Windows settings. You simply cannot be sure how a date should be entered in a workbook unless you know how the current version of Windows is set up. One way of eliminating the frustration of entering the date 30/11/98 and having it appear as text and not a date is to use a calendar to select a date for you rather than having to type it (see Figure 1c). It is a simple process to create this Date Selection Calendar application and you can attach it to an individual worksheet or, better still, add it to your Personal.xls workbook so it will be available for use with all your workbooks. Here are the instructions for a Date Selection Calendar that you create only once and which will work with any Excel 97 workbook. Step 1: Open any workbook on the screen. Step 2: Select Tools, Macro, Visual Basic Editor to start up the Visual Basic Editor. Display the Project Explorer window using View, Project Explorer and locate the VBA Project for Personal.xls and select it. Step 3: Select Insert, UserForm to add a form to this project. Step 4: Select Tools, Additional Controls and scroll down to locate the Calendar Control 8.0, select its check box and select OK. The Calendar icon should now appear in your toolbox. If the toolbox is not visible on the screen, select View, Toolbox to display it. Step 5: Select the Calendar icon in the toolbox and click and drag a Calendar object onto the new form. Size the form and the Calendar control so the Calendar object fits neatly on the form and you have room to add two buttons for OK and Cancel. Step 6: Select the CommandButton icon in the toolbox and click and drag a command button onto the form for the OK button and then repeat the process to add a second for the Cancel button (Figure 2c). Step 7: Use the properties dialogue to select each object in turn and set the properties listed in the box 'Properties for objects'.
Step 8: Double-click in an unused area on the UserForm to display the code area. From the top-left drop-down list select UserForm and from the top-right drop-down list select Initialize. Add the code for the Initialize event so the code appears as:
From the top-left drop-down list select cmdCancel and from the top-right drop-down list select Click. Add the code for the Click event so the code appears as:
From the top-left drop-down list select cmdOK and from the top-right drop-down list select Click. Add the code for the Click event so the code appears as:
Step 9: Look in the Project Explorer window in the Personal.xls area and see if there is a module there -- if it is it will appear in the Modules folder and will be called module1 or something similar. If you find a module, double-click on its name to open its code and, if not, select Insert, Module to add a new module to your project. From the top-left drop-down list select General and from the top-right drop-down list select Declarations and type this code:
Select File, Save Personal.xls and then File, Close and Return to Microsoft Excel to return to your workbook. Step 10: Add a button to your toolbar to run this code by right-clicking the toolbar and select Customize. Select the Commands tab and from the Categories list select Macros. From the Commands list box drag the Custom Button onto the toolbar and right-click it. Select Assign Macro from the menu and from the Assign Macro dialogue box select the macro SetDate (it may appear in the macro list as PERSONAL.XLS!SetDate) and click OK. Right-click again on the new button and select Edit Button Image to change the custom button face or select Change Button Image to select one from the list. When you're finished, select Close to return to your file. Step 11: Test the code by selecting a cell and then select the button on the toolbar. The Calendar will appear on the screen displaying today's date. Select any date from the calendar and press OK to insert the date into the currently selected cell or click Cancel or press Escape to exit without making a choice.
How the date selector works
When the macro is run the UserForm called frmDateSelect is displayed. The UserForm contains the calendar and an OK and a Cancel button. If you select the Cancel button the form is simply unloaded, which removes the form from the display and frees up the memory it was using. The same code is run if you press the Escape key -- this is because the cmdCancel button has its Cancel property set to True. The calendar initially displays the current system date and you can play around with it all you like as there is no code attached to the calendar control itself. Only when you select the OK button will your selection be recorded in the currently selected cell or cells -- this is the code that handles this:
Once the date has been recorded, the userform is unloaded. Any errors are dealt with by including the line 'On Error Resume Next' in the procedure. Once you've created this wonderful Date Selection Calendar you'll be the envy of everyone at work, so don't be surprised if you get asked to create one for everyone else!
|
 Figure 1c: This wonderful Date Selection Calendar makes entering dates into a worksheet as simple as pointing and clicking with your mouse.
|
||||||||||||||||||||||||||||||||
| Helen Bradley can be contacted at helen@journalist.com
|
|||||||||||||||||||||||||||||||||
|
